入门
简介
简化spring应用开发的一个框架
整个spring技术栈的一个大集合
J2EE开发的一站式解决方案
微服务
一个应用就是一个小型服务
开发,测试,部署简单
微服务是架构形式,分布式是部署方式
配置
配置文件
application.yml或application.properties
作用:修改springboot自动配置的默认值
yaml:以数据为中心,比json,xml更适合做配置文件
yaml基本语法
key:(空格)value,空格不能省略
字面量:普通的值(数字,字符串,布尔)
“":双引号会转义
‘':单引号不会转义
数组的写法
1
2
3
4
|
pets:
	- cat
	- dog
	- pig
|
行内写法:pets: [cat,dog,pig]
pom.xml导入配置文件处理器依赖,会有在配置文件中提示
1
2
3
4
5
|
<dependency>
    <groupId>org.springframework.boot</groupId>
    <artifactId>spring-boot-configuration-processor</artifactId>
    <optional>true</optional>
</dependency>
|
配置文件写法:
 1
 2
 3
 4
 5
 6
 7
 8
 9
10
11
12
13
|
person:
  name: zhangsan
  age: 14
  boss: true
  birth: 2006/12/12
  maps: {k1: v1,k2: v2}
  lists:
    - l1
    - l2
    - l3
  dog:
    name: 小狗
    age: 5
|
javaBean写法:
 1
 2
 3
 4
 5
 6
 7
 8
 9
10
11
12
|
@ConfigurationProperties(prefix = "person")
@Component
public class Person {
    private String name;
    private String age;
    private boolean boss;
    private Date birth;

    private Map<String,Object> maps;
    private List<Object> lists;
    private Dog dog;
}
|
@ConfigurationProperties和@Value的区别
|
@ConfigurationProperties |
@Value |
| 功能 |
批量注入 |
单个 |
| 松散语法绑定 |
支持 |
不支持 |
| spel |
不支持 |
支持 |
| jsr303数据校验 |
支持 |
不支持 |
配置类
写法
1
2
3
4
5
6
7
8
9
|
@Configuration
public class MyConfig {
    //将方法的返回值添加到容器中
    @Bean
    public HelloService helloService() {
        System.out.println("helloService组件添加成功");
        return new HelloService();
    }
}
|
测试是否在ioc容器
1
2
3
4
5
6
7
8
|
@Autowired
ApplicationContext ioc;

@Test
public void testHelloService() {
    boolean b = ioc.containsBean("helloService");
    System.out.println(b);
}
|
Profile
1.在配置文件中指定profile
 1
 2
 3
 4
 5
 6
 7
 8
 9
10
11
12
13
14
15
16
17
18
19
20
21
22
|
server:
  port: 8088

spring:
  profiles:
    active: dev

---

server:
  port: 8083

spring:
  profiles: dev

---

server:
  port: 8084

spring:
  profiles: prod
|
2.命令行
java -jar wasd.jar --spring.profiles.active=dev
3.虚拟机参数
-Dspring.profiles.active=dev
配置文件加载位置
SpringBoot启动会扫描以下位置的application.properties或者application.yml文件作为Spring boot的默认配置文件
-
-file:./config/
-
-file:./
-
-classpath:/config/
-
-classpath:/
springboot会从这四个位置全部加载主配置文件
自动配置原理
视频讲解:https://www.bilibili.com/video/BV1gW411W76m?p=19
精随:
1)SpringBoot启动会加载大量的自动配置类
2)我们看我们需要的功能有没有SpringBoot默认写好的自动配置类;
3)我们再来看这个自动配置类中到底配置了哪些组件;(只要我们要用的组件有,我们就不需要再来配置了)
4)给容器中自动配置类添加组件的时候,会从properties类中获取某些属性。我们就可以在配置文件中指定这些属性的值;
自动配置类在一定条件下才能生效
application.yml 加上 debug: true,让控制台打印自动配置报告
 1
 2
 3
 4
 5
 6
 7
 8
 9
10
11
12
13
14
15
16
17
18
19
20
21
22
23
24
25
26
27
28
29
30
31
32
33
34
35
36
37
38
39
40
41
42
43
44
45
|
============================
CONDITIONS EVALUATION REPORT
============================


Positive matches:	(自动配置类启用的)
-----------------

   AopAutoConfiguration matched:
      - @ConditionalOnProperty (spring.aop.auto=true) matched (OnPropertyCondition)

   AopAutoConfiguration.ClassProxyingConfiguration matched:
      - @ConditionalOnMissingClass did not find unwanted class 'org.aspectj.weaver.Advice' (OnClassCondition)
      - @ConditionalOnProperty (spring.aop.proxy-target-class=true) matched (OnPropertyCondition)

   DispatcherServletAutoConfiguration matched:
      - @ConditionalOnClass found required class 'org.springframework.web.servlet.DispatcherServlet' (OnClassCondition)
      - found 'session' scope (OnWebApplicationCondition)


Negative matches:	(自动配置类没有启用的)
-----------------

   ActiveMQAutoConfiguration:
      Did not match:
         - @ConditionalOnClass did not find required class 'javax.jms.ConnectionFactory' (OnClassCondition)

   AopAutoConfiguration.AspectJAutoProxyingConfiguration:
      Did not match:
         - @ConditionalOnClass did not find required class 'org.aspectj.weaver.Advice' (OnClassCondition)

   ArtemisAutoConfiguration:
      Did not match:
         - @ConditionalOnClass did not find required class 'javax.jms.ConnectionFactory' (OnClassCondition)

   BatchAutoConfiguration:
      Did not match:
         - @ConditionalOnClass did not find required class 'org.springframework.batch.core.launch.JobLauncher' (OnClassCondition)

   CacheAutoConfiguration:
      Did not match:
         - @ConditionalOnBean (types: org.springframework.cache.interceptor.CacheAspectSupport; SearchStrategy: all) did not find any beans of type org.springframework.cache.interceptor.CacheAspectSupport (OnBeanCondition)
      Matched:
         - @ConditionalOnClass found required class 'org.springframework.cache.CacheManager' (OnClassCondition)
|
日志
| 日志门面(日志的抽象层) |
日志实现 |
JCL ( Jakarta Commons Logging ) ,SLF4j ( Simple LoggingFacade for Java ) ,jboss-logging |
Log4j,JUL ( java.util.logging ),Log4j2,Logback |
SLF4j 和 Logback 的使用
日志记录方法的调用不应该直接调用日志的实现类,而是调用日志抽象层里的方法
1
2
3
4
5
6
7
8
9
|
import org.slf4j.Logger;
import org.slf4j.LoggerFactory;

public class HelloWorld {
  public static void main(String[] args) {
    Logger logger = LoggerFactory.getLogger(HelloWorld.class);
    logger.info("Hello World");
  }
}
|
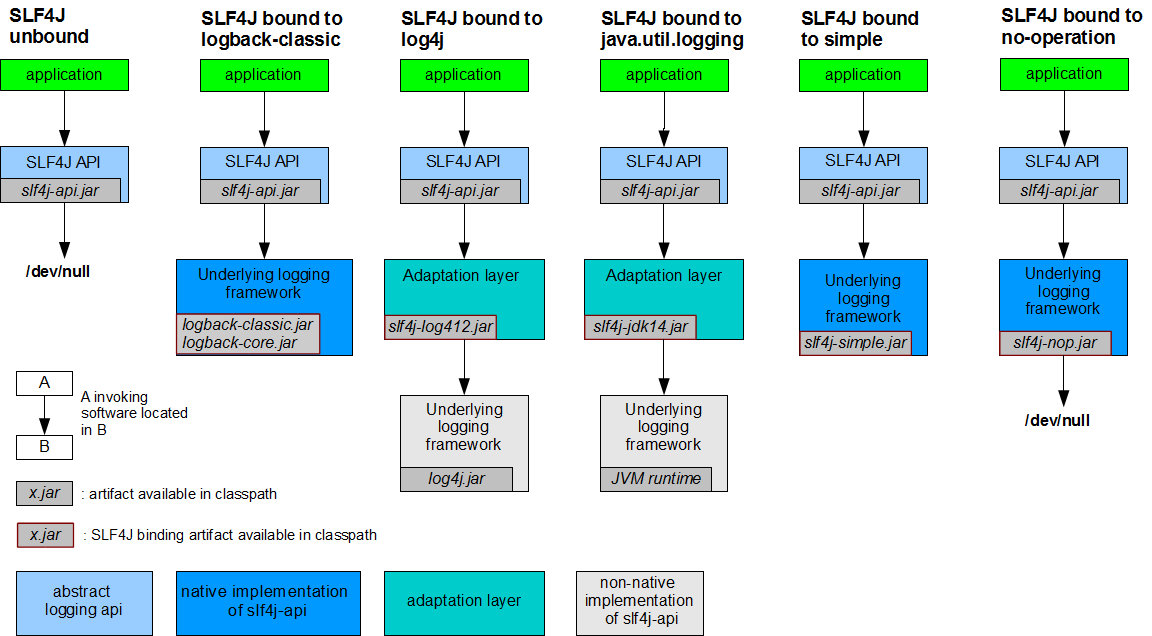
每一个日志的实现框架都有自己的配置文件,使用slf4j以后,配置文件还是做成日志实现框架自己本身的配置文件
遗留问题
( slf4j+logback ) : Spring ( commons-logging )、Hibernate ( jboss-logging ) 、MyBatis、xxxx
统一日志记录,即使是别的框架和我一起统一使用 slf4j 进行输出?
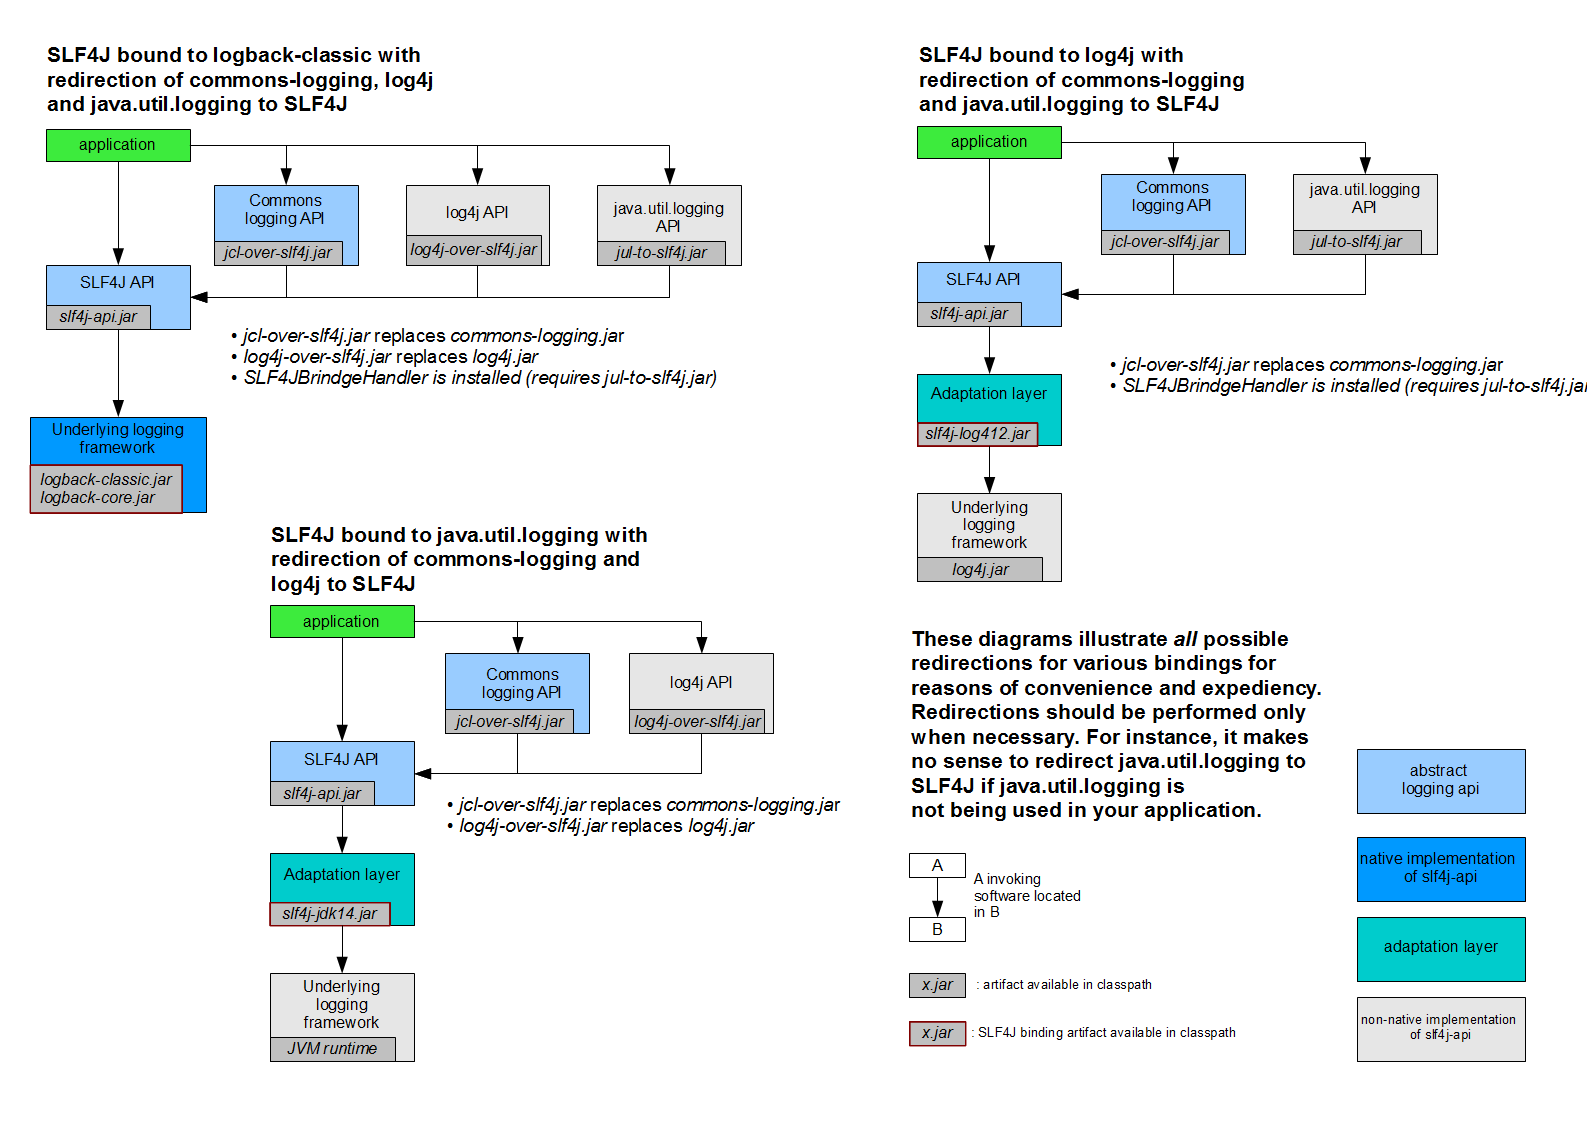
如何让系统中所有的日志都统一到 slf4j ?
- 将系统中其他日志框架先排除出去
- 用中间包来替换原有的日志框架
- 我们导入 slf4j 其他的实现
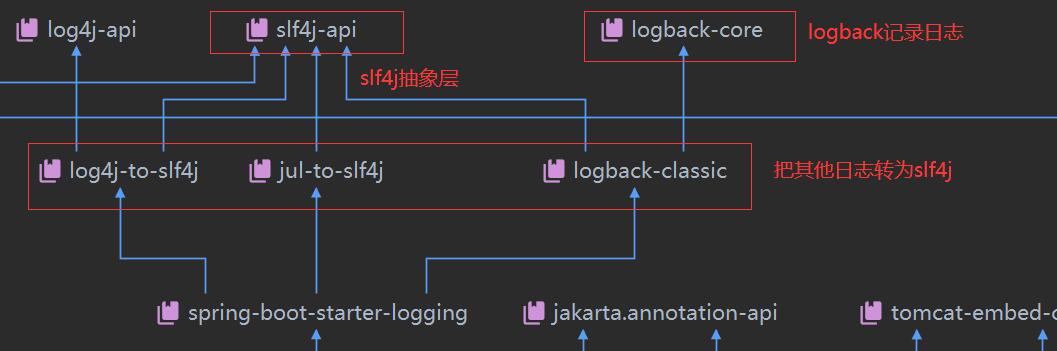
springboot 底层也是使用 slf4j 和 logback 的方式进行日志记录
 1
 2
 3
 4
 5
 6
 7
 8
 9
10
11
12
13
14
15
16
17
18
19
|
import org.slf4j.Logger;
import org.slf4j.LoggerFactory;
@SpringBootTest
class DemoApplicationTests {
//记录器
Logger logger = LoggerFactory.getLogger(getClass());
@Test
public void contextLoad(){
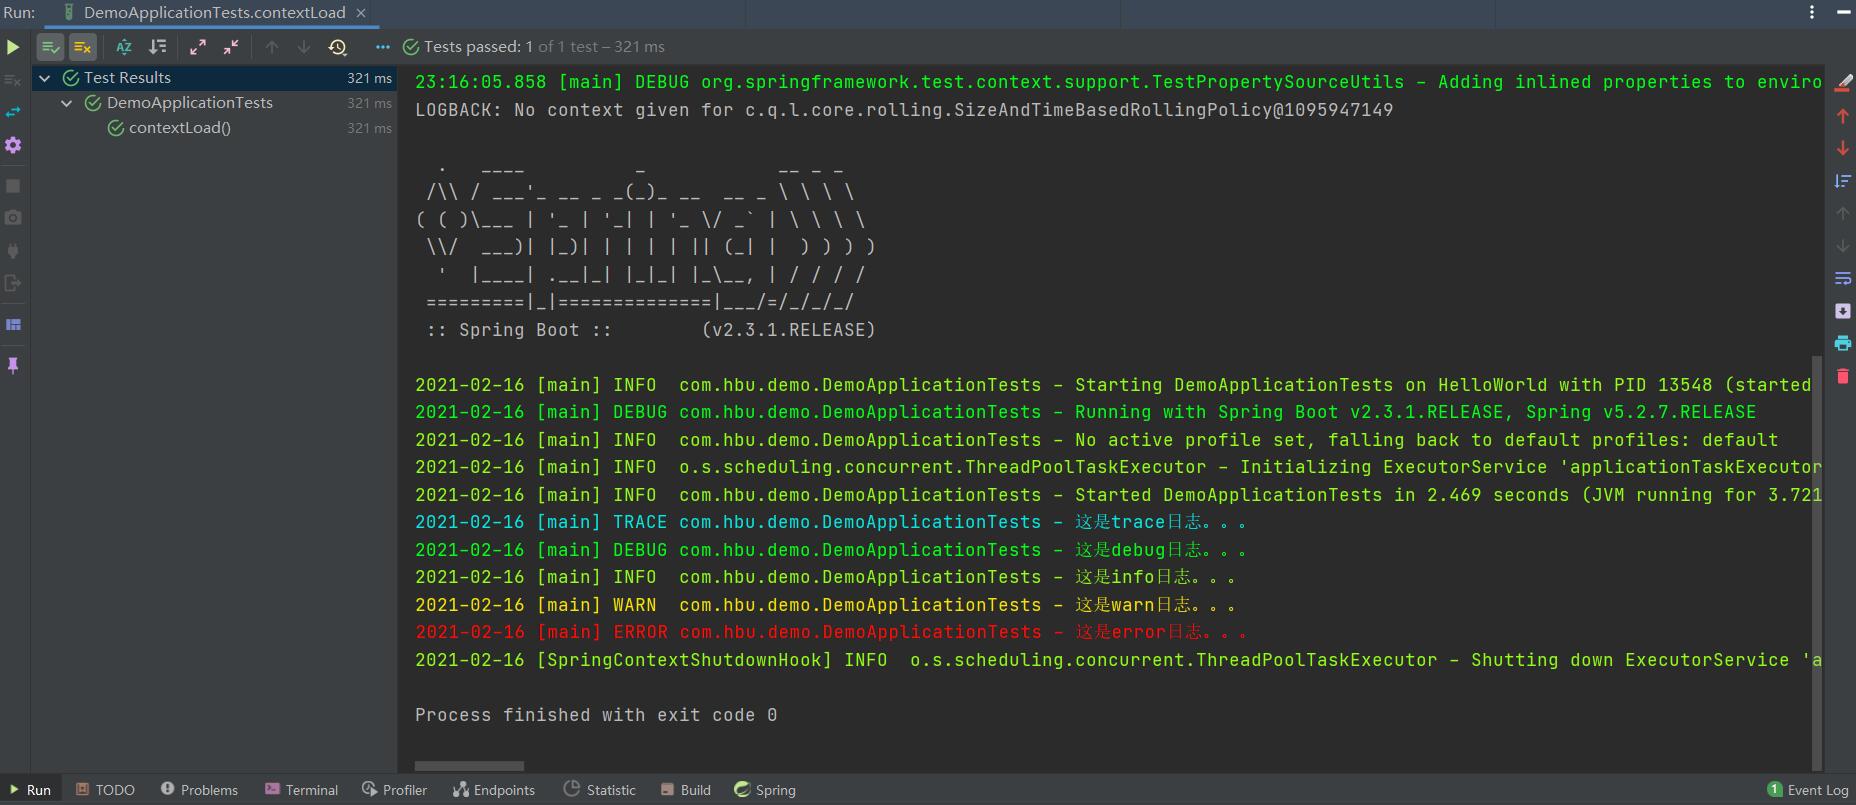
//日志的级别
// 由低到高:trace < debug < info < warn < error
//可以调整输出日志的级别,日志在这个及以后的高级别生效
logger.trace("这是trace日志。。。");
logger.debug("这是debug日志。。。");
logger.info("这是info日志。。。");
logger.warn("这是warn日志。。。");
logger.error("这是error日志。。。");
}
}
|
日志的相关配置
 1
 2
 3
 4
 5
 6
 7
 8
 9
10
11
12
|
logging:
  # 日志打印级别

  level:
    com.hbu.demo: trace
  # 日志文件保存路径

  file:
    path: e:/spring/log
  pattern:
    # 指定控制台输出的日志格式

    console: '%d{yyyy-MM-dd} [%thread] %-5level %logger{50} - %msg%n'
    # 指定文件输出的日志格式

    file: '%d{yyyy-MM-dd}====[%thread]======%-5level====%logger{50}======%msg%n'
|
输出结果:
web开发
使用SpringBoot
- 创建SpringBoot应用,选中我们需要的模块
- SpringBoot已经默认将这些场景配置好了,只需要在配置文件中指定少量配置就可以运行起来
- 自己编写业务代码
自动配置原理?
这个场景SpringBoot帮我们配置了什么?能不能修改?能修改哪些配置?能不能扩展?
xxxAutoConfiguration:帮我们给容器中自动配置组件
xxxProperties:配置类来封装配置文件的内容|
-
所有/webjars/**,都去classpath:/META-INF/resources/webjars/找资源,webjars: 以jar包的方式引入静态资源,webjars网站:https://www.webjars.org/,访问路径:http://localhost:8080/webjars/jquery/3.1.0/jquery.js
-
/**访问当前项目的任何资源(静态资源的文件夹)
"classpath :/NETA-INF/resources/",
"classpath :/resources/",
"classpath: /static/",
"classpath: /public/",
"/":当前项目的根路径
-
欢迎页;静态资源文件夹下的所有index.html页面;被/**映射
-
所有的**/favicon.ico都是在静态资源文件下找’
模板引擎
常见模板引擎:JSP、Velocity、Freemarker、Thymeleaf
springboot 推荐 Thymeleaf
引入thymeleaf
1
2
3
4
|
<dependency>
    <groupId>org.springframework.boot</groupId>
    <artifactId>spring-boot-starter-thymeleaf</artifactId>
</dependency>
|
thymeleaf 语法
 1
 2
 3
 4
 5
 6
 7
 8
 9
10
|
//Thymeleaf 配置类
public class ThymeleafProperties {
    private static final Charset DEFAULT_ENCODING;
    public static final String DEFAULT_PREFIX = "classpath:/templates/";
    public static final String DEFAULT_SUFFIX = ".html";
    private boolean checkTemplate = true;
    private boolean checkTemplateLocation = true;
    private String prefix = "classpath:/templates/";
    private String suffix = ".html";
    private String mode = "HTML";
|
只要把html文件放在classpath:/templates/路径下就会自动渲染
使用:
-
导入 themeleaf 的名称空间<html lang="en" xmlns:th="http://www.thymeleaf.org">
-
使用 thyleaf 语法
 1
 2
 3
 4
 5
 6
 7
 8
 9
10
11
|
<!DOCTYPE html>
<html lang="en" xmlns:th="http://www.thymeleaf.org">
<head>
    <meta charset="UTF-8">
    <title>Title</title>
</head>
<body>
<h1>成功!</h1>
<p th:text="${hello}">这里显示文本信息</p>
</body>
</html>
|
语法规则
Simple expressions: (表达式语法)
        Variable Expressions: ${...}
        Selection Variable Expressions: *{...}
        Message Expressions: #{...}
        Link URL Expressions: @{...}
        Fragment Expressions: ~{...}

Literals: (字面量)
    Text literals: 'one text' , 'Another one!' ,…
    Number literals: 0 , 34 , 3.0 , 12.3 ,…
    Boolean literals: true , false
    Null literal: null
    Literal tokens: one , sometext , main ,…

Text operations: (文本操作)
    String concatenation: +
    Literal substitutions: |The name is ${name}|

Arithmetic operations: (数学运算)
    Binary operators: + , - , * , / , %
    Minus sign (unary operator): -

Boolean operations: (布尔运算)
    Binary operators: and , or
    Boolean negation (unary operator): ! , not

Comparisons and equality: (比较运算)
    Comparators: > , < , >= , <= ( gt , lt , ge , le )
    Equality operators: == , != ( eq , ne )

Conditional operators: (条件运算)
    If-then: (if) ? (then)
    If-then-else: (if) ? (then) : (else)
    Default: (value) ?: (defaultvalue)

Special tokens:
    No-Operation: _